Locating a Station
Click on "Stations", then "Find Station". A window will pop up. You can now enter a call or part of a call. By default it will search for an exact match (full call, not partial) and is not case sensitive. If you are looking for a partial match, "Match Exact" should not be selected.
For objects which could contain lower case letters you have to check "Match Case"! Opposite to the name, without "Match Case" the search text will only be converted to upper case...
Clicking on the "Locate Now!" button will center the first station
found in the center of your screen at the current zoom level.
Clicking on "Cancel" will close the window.
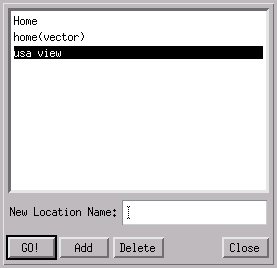
Click on "Maps", then "Map Display Bookmarks" and a window will pop up.
If this is the first time you have used this then the box will have no
entries in it. To add a bookmark to the list: Position the main map to
the area and zoom level you want to use. Enter a unique name in the
"New Name" area, then click on add. Your entry will be added to the
list (in alphabetical order). You can add as many map display bookmarks
as you want. To use one of the locations click on location name and click
"Activate!". The main map will then show the stored area and zoom level.
You can similarly delete a bookmark by clicking on the bookmark name and
then the "Delete" button.
"Maps->Locate Map Feature" is another method to jump to a location, if
the name of the location is known and you have GNIS files installed.
Click on "Stations", then "Track Station". Enter the callsign to track (all or
part) then click on the "Track Now!" button. As the station moves it will
remain viewable in the main map window. As the stations starts to get close
to the edge of the map window the window will recenter so that the object is
always visible. To stop tracking this station click on the "Clear Tracking"
button. While tracking is active, a "Tr" is shown in the status bar next to
the zoom level. If the station is not on the map yet, tracking will begin
as soon as it shows up.
A station could place several different objects on the map, with their
position transmitted to other stations. The object names are less restrictive
than the normal station names.
Objects and items are nearly the same things, but their use could differ a bit.
Objects are generally used for moving or variable things such as thunderstorms,
while items are generally used for more inanimate things, such as water
stations. Because items may not be decoded by some flavors of APRS(tm)
programs, objects are often used for inanimated things, too.
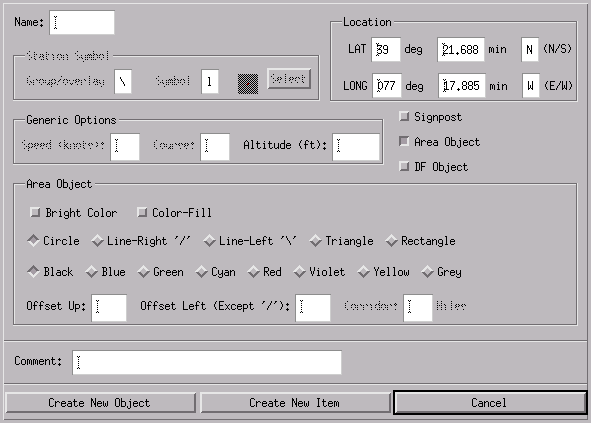
Besides normal objects with a symbol at its position there are some special
objects available. Area objects are useful for a variety of operations in
which you want to draw or highlight an area of interest on the map. They can
also be used to draw trails/roads/boundaries, watchboxes for severe weather,
runways, perimeters of a search area or of a public service event, areas of
damage, areas to stay out of, buildings that aren't on the map, checker/chess
boards for gaming on APRS(tm). :-) Note that area objects are not
implemented on all versions of APRS(tm) programs, and some of the details of
how they are displayed may also be different on other programs.
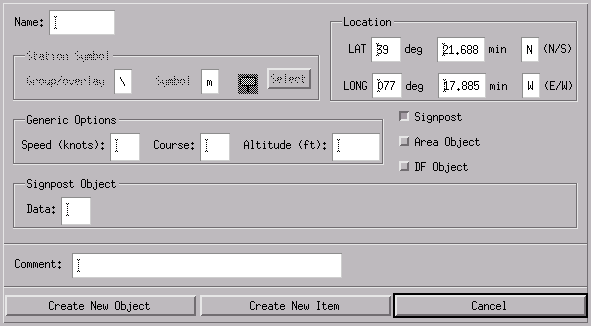
For the other two, signpost and DF objects, see below.
Objects are retransmitted at the rate of station position reports, configured
in File|Configure|Defaults, and will cease retransmitting after double the
station display time, also configured there. "killed" objects are also
retransmitted in this manner, until they expire from the queue.
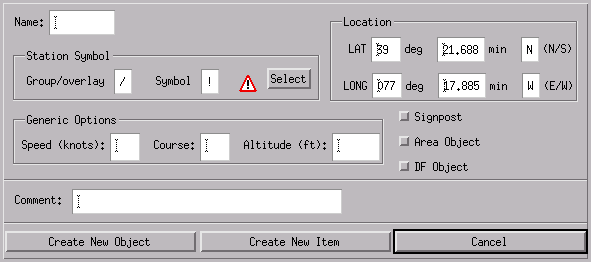
The Object/Item creation option in the right click menu will bring up a dialog
with the position of your object filled in based on where you clicked the
mouse. You may fill in the details, and add an object/item from this menu.
The Object/Item modification option brings you the object modification dialog.
It is similar to the object creation dialog, except the object's current
information is already filled out, and the object's name and a few of the
other options can't be changed. You could also delete the object with this
option.
Objects and items can be moved with the mouse if the "Move" checkbox on the
toolbar is enabled.
Description of the entries in the object dialogue:
Always delete your objects and items when you are done with them!
Don't just allow them to expire from your cache, as they may hang
around on other people's screens for an extended period.
Creating and using Map Display Bookmarks
Tracking a Station
Objects and Items
Printing the Map Screen
Xastir can print the drawing area in either black & white or color. It does
this by first dumping the image to an XPixmap file on disk, then using external
tools to convert it to postscript, scale it, rotate it, preview it, then print
it. You must have your system printing set up to handle postscript (usually
this requires Ghostscript and a print filter installed, as well as lp or lpr
print spoolers). You must also have the following tools installed for this
capability: ImageMagick tools (specifically "convert"), "Ghostscript",
Ghostscript fonts, and "gv". Once all of these packages are installed and
functional, you should get a "gv" window popping up shortly after you tell
Xastir to create a print file. From there you can view the printed image, and
if acceptable, tell "gv" to print it. Note that sometimes changing to a white
default background for the maps is recommended, depending on what maps you have
viewable. This can save greatly on ink.
Creating Automatic Snapshots
Xastir has the capability to create automatic snapshots of the map screen
on a recurring basis. This time period is currently set at once per five
minutes. Assuming that you have "convert" from the ImageMagick tools
installed, Xastir will create an XPM format file in /var/tmp, then convert
it to the PNG file /var/tmp/xastir_snap.png. This file is useful for putting
on web pages to show a live image of what is on your Xastir screen. Enable
this feature via the "File->Enable PNG Snapshots" togglebutton.