Moving the Map and the Options Menu
Map movement is very simple, ease and quickness of movement is dependent on your processor speed and the amount of detail you load.
Zooming:
Zooming can be accomplished by right clicking on the map (and holding the button down). This will bring up an options menu, with choices to zoom in or out a single level, or to change to one of the preset zoom levels.All zooming functions from the options menu will zoom in or out at the point on the map where you clicked the right mouse button. Zoom levels have a cascade menu. Levels 1-64 are for very local areas and levels 256 and above are for large areas. The lower number the level, the more local the area.
A quicker zoom function is to push and hold the left mouse button, drag it across the area of interest and let go. The map will zoom to approximately the size of the square you just described with the mouse drag operation. The program uses the vertical component to decide on the zoom level, and the vertical and horizontal components to compute the new map center. The "move" and "measure" toolbar checkboxes must be disabled for this feature to work.
The map can also be zoomed with the keyboard PageUp/PageDown keys. The zooming in this case keeps the same map center.
Panning/Centering:
The map can be centered at a specific location by choosing center in the right-click options menu. Clicking the middle button zooms out with a factor of 2, centering where you clicked.Panning is also accomplished by using the options menu, or by using the arrow buttons on the top of the screen. The map position will shift a portion of a screen. Enough data from the previous screen should be available to reorient yourself.
The map can also be panned and zoomed with the arrow keys.
More About the Options Menu:
The "Station Info" selection on the options menu will look for the station closest to where you right clicked the mouse. If more than one station is close to that position a "Station chooser" list will appear, then you can choose what station's data you want to look at. If only one station is close to the mouse pointer then that station's data will display immediately. For mobile stations with a lot of track data this could need some time on slow computers. Note that expired stations still have their data stored in the Xastir database, and if one knows a station's former location, one can still view its info in this manner. It is also possible to display old stations by turning on the "Display Expired Data" option in the stations menu. FIXME: Not entirely true. This just displays some of the data that dissapears for ghosted stations, like speed/altitude, etc.
For Object and Item information, please see the help topic Objects and Items.
For old stations the symbol is drawn ghosted and in its standard orientation.
Corresponding trails are dashed rather than solid and all data except the
callsign disappear from the screen. Exception: If "Display Expired Data"
is enabled, then the data will not disappear when ghosting a symbol.
These are very similar. "Send message to" will send your messages to one
station and will only receive data from that station. Group messages are more
general: you can receive any message for the group and you will send out your
messages to that group name. Group messages code is not fully implemented yet
and various problems still need to be worked out. The "groups" file is looked
for in ~/.xastir/config. This is where the groups you are a member of are
stored. As was said before the "groups" functionality may not be complete yet.
At some point in the near future sending of bulletins should be added to this
menu as well. It's not coded yet.
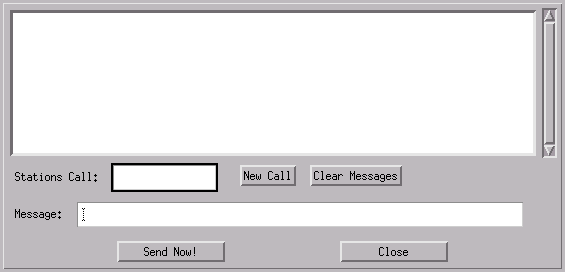
Each of these two screens contains a message box, a call line, a message line,
and various buttons. You must first enter the call of the group or station you
want to contact. Once that is done any new message that has come in from that
station to you will be displayed. If the station is sending you information
and no message window is up it will automatically pop up a new window (up to
10) with that station's call sign filled in for you. You can now enter a
message on the message line. The message can be longer that the message line,
and will max out at about 250+ characters. Once your message is entered,
clicking on the "Send Now!" button will send your message. The "Send Now!"
button will gray out until your message is completely Acked. Any message you
receive will be sorted by the line # and be placed in the message window. If
you are in a group mode each line will display the call sign from where the
message was sent followed by the message itself. Currently group messages are
sorted by call and then line #. When you are done sending messages clicking on
the exit button will close the window. Two other buttons are also available.
The "New Call" button will allow you to look at old data a station has sent.
Type in the call and click on this button, any old information will be
displayed. You can also use this button to change the call of the station
you're talking with. Enter the new call and click the button. The "Clear
Messages" button will clear any message displayed in the message window.
Stations Menu
These options will allow you to control the data displayed around the stations
on the map. It will also let you track and find stations, and clear stations
and trails from the map.
Messages and the Messages menu
 Send Message to and Open group messages