Configure the Station Information
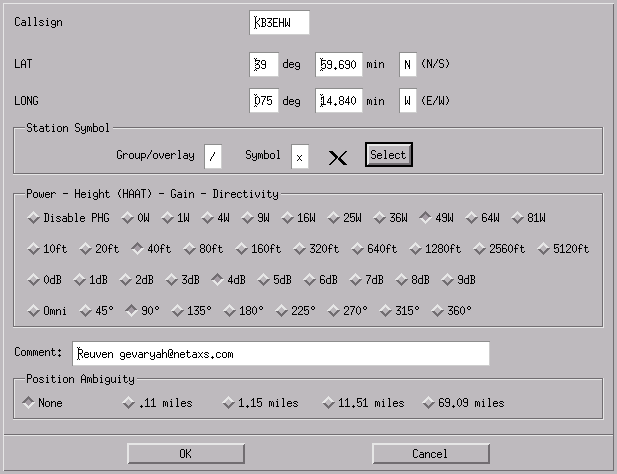
Click on File, then Configure, then Station.
Fill in your Amateur Station call sign.
Fill in your station position if you are not using Xastir with a GPS unit. You can locate your general position on the map with Xastir and use the position given by the cursor placement over the map. This position will be viewable in the box at the bottom of the Xastir screen 2nd from the left, whenever the mouse is over the drawing area. If you have a GPS you can skip this and set up the GPS later.
To select a symbol to be used for your station you need to specify a group and a symbol character. You can manually fill in these fields, or press select to graphically choose a symbol. There are two groups of symbols available. A text description of each symbol can be found in the symbol table help topic.
For some symbols of the secondary group you can specify an overlay. With that a symbol will be displayed together with an additional overlay character, e.g. a car symbol with the number 1 atop.
For using overlays you need to select a symbol from the secondary symbol table and enter the overlay character to be shown in the group/overlay field. Only numbers and uppercase characters are allowed as overlay characters. According to the APRS(tm) specification not every symbol can be overlayed, Xastir doesn't enforce this, but some other programs may. Note that not all of the symbols have been implemented in the graphics chooser yet, and some of them are not per the APRS(tm) spec yet.
Next, enter the data for the power/height/gain of your station. This is useful information to add but is not required; simply select "Disable PHG" to disable it. These choices present a granular representation of your station. Select the combination of values closest to the description of your station.
Another option would be to specify the RNG in the comment field in miles instead of using PHG. See the APRS(tm) spec for details.
Please use height above average terrain for the height value. Do NOT use average height above sea level or height above ground.
For Gain use the gain of your antenna in dBi.
(FIXME: dBd? spec is unclear, I think it's implying dBi because it says "in absence of any data, stations are assumed to be running 10w to a 3dB omni at 20ft. A typical onmi is only 3dBi.....)
Note: The gain setting is really intended for vertical antennas; the gain setting for a beam should be quite a bit below the forward gain of the beam. This is because with directivity set, the PHG circle is only offset by 1/3rd of its size toward the specified direction. Setting gain higher will enlarge the whole circle unrealistically, rather than increasing the directivity. There was talk several years ago about ammending the specifications to better deal with beam antennas, but nothing was changed.
Enter a comment, not required but it will add insight on your station. A common thing to enter here is your preferred e-mail address. It will be transmitted along with your posits.
Position ambiguity will allow you control how accurate you transmit your position. A setting of none will allow your station to transmit the exact position you have entered or received from a GPS. The other choices will place you somewhere in the range of the choice you selected. Note that this may throw some non-spec compliant stations for a loop. Findu.com doesn't understand position ambiguity.
Clicking OK will save your changes, Clicking on Cancel will keep the
previous settings.
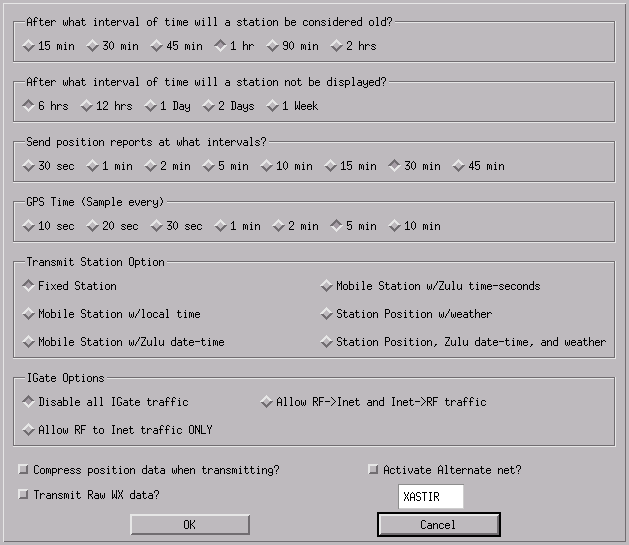
Click on File, then Configure, then Defaults.
This page sets up some standard defaults for the program operation. Old
stations will be displayed with a ghosted icon, and the corresponding trail
will be fragmented.
The first set of toggle buttons specify the ghosting interval. The second
set of buttons specify when a station will be removed from the screen.
Stations are also removed from the internal database at double this time,
so if you set it for 6 hours, stations will be deleted from the database
at 12 hours.
The third set of buttons specify how often your station's posit will be
transmitted. For fixed stations a good recommendation is every 30 minutes,
and definitely no less than 10 minutes. Mobile stations may wish a faster
rate. This interval is also used for sending out objects and items. Try
to keep this interval somewhat reasonable, as transmitting to a long path
every 30 seconds will really take up a lot of the air time.
GPS Time will set the interval of time to look at the GPS for new data. This
is available for stations using an HSP or shared cable with their TNC.
Transmit Station Option sets the type of packet your station will transmit
its data as.
IGate Options will set your station up as an Internet-RF gateway. This option
should be used with caution; As a ham you are responsible for the data that
comes in via the Internet and is transmitted via RF. You also will need to
choose an igate option on each interface in order for the igate to function.
If you want to have your igate forward NWS weather alerts to RF, you must
create a ~/.xastir/data/nws-stations.txt file listing each call or NWS station
(like "PHISVR") that you would like to transmit via RF.
"Compress position data while transmitting?", if selected, will transmit in
the newer compressed format. This format will reduce the amount of data on
the air, thereby increasing the capacity of the APRS(tm) network. The maximum
precision of the transmitted position is also higher. Some older programs,
including even recent versions of WinAPRS, do not decode this format yet.
Findu.com might also have trouble with it.
"Transmit Raw WX data", if selected, will also send a packet containing raw
Weather Station Data. This is useful on ASCII types of WX stations,
like Peet Bros. WX stations.
You can also select Altnet and choose an altnet call from this dialog. Altnet
allows you to have a private APRS(tm) network among the stations that also
have altnet configured, and have the same altnet call entered.
To use this option you must have a sound card and a program that will play
wav files. The Audio Play Command should contain the program you want to
execute to play the audio file (and any command line options). That of
course doesn't work if the only soundcard in the system is used for a
soundmodem...
The fields will contain the name of the file to play. Fields under the option
will set parameters for the option.
The current choices are:
Once you have festival installed, Xastir will have the ability to speak using
the following choices:
Configure Default Operation
Configure Audio Alarms
 Click on File, then Configure, then Audio Alarms.
Configure Speech Synthesis
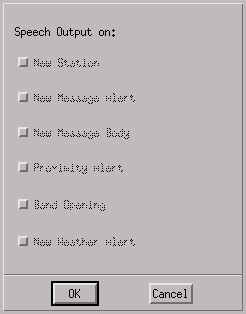 To use this option you must have a sound card and the 'festival' speech
synthesis software installed. Install Festival and start it in 'server'
mode prior to starting up XASTIR. The normal command for this is
(festival --server &).
To use this option you must have a sound card and the 'festival' speech
synthesis software installed. Install Festival and start it in 'server'
mode prior to starting up XASTIR. The normal command for this is
(festival --server &).
New Station       - Announce the call of a new station.
New Message Alert - Announce the arrival of a new message.
New Message Body  - Speak the contents of a message.
Proximity Alert   - Announce when receiving data from a station within the
    min.max distance of your proximity settings.  This option uses the
    proximity settings found in the Audio Alarms menu.
Tracked station Proximity Alert - Announce when receiving data from a
       station within the min.max distance of the tracked station. This option
       uses the proximity settings found in the Audio Alarms menu.
Band Opening      - Announce when receiving data from a station (via TNC)
    within the min/max distance of your band opening settings.  This option
    uses the distance settings found in the Audio Alarms menu.
New Weather Alert - Not implemented yet.
Info on Festival may be obtained from http://www.speech.cs.cmu.edu/festival/
Configure Units of Measure
The default selection is for the Metric System: mm, cm, KPH, etc. To select
English units, inches, feet, MPH, etc. Click on File, then Configure, then
toggle the "Enable English Units" checkbox.
Save Config Now!
This button will save all of the current configuration to the config file.
Note that when Xastir is closed, it also saves configuration to the config
file.