Map Menu and Map Chooser
Map Menu:
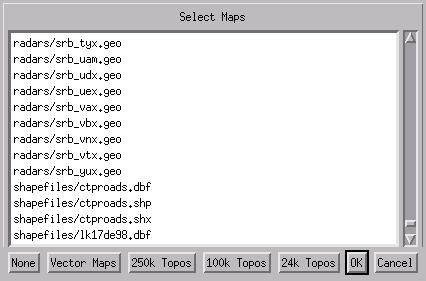
Map Chooser
This will present you with a list of map files in your map directory. Click
on map names to highlight them, this will cause them to be displayed when
you click the OK button. You may select any number of maps. Clicking the
OK button will display the selected maps. Cancel will abandon any changes.
There are also shortcut buttons to select all of a certain type of map,
or deselect all of the maps at once.
- Enable/Configure Tigermap
- Turning this option on causes Xastir to download the map from the US census
bureau's online tiger mapping server. The dialog that comes up allows one to
select which layers are displayed, as well as the brightness of the resulting
map. This is only available if you have compiled with ImageMagick support.
- Map Display Bookmarks
- See the help topic Creating and using Jump Locations.
- Locate Map Feature
- This option brings up a search dialog where you can search through the labels
in a GNIS file to find a specific location. It will center the map on the
new location if it is found. The "GNIS File:" entry is saved between calls
and between invocations of Xastir.
- Disable All Maps
- This option disables the loading of any maps. It is most useful when doing
rapid zooming or panning, because it saves the need to load the maps on each
redraw. Note that this option is not saved between sessions.
- Coordinate Calc
- This option opens a simple calculator that can convert between coordinate
systems. This is useful for converting positions to the various formats used by
different groups of people.
- Enable Auto Maps
- When enabled, any map found in the map directory (or any directory under it) will
be displayed if it falls within the current display region. You can add any
number of directory levels under the main map directory for your maps. Auto
maps will go through them all and find what map (or part) should be displayed.
All Maps will be merged into the viewing area. If you have a large quantity
of maps, very detailed maps or a slower computer this can be quite slow. When
this option is off, maps selected with the Map Chooser will be displayed.
- Enable Map Grid
- When enabled, this option will display a grid line every 10 degrees. As you
zoom in it switches to a 1 degree spacing.
- Enable Map Levels
- When enabled, this option will try to filter out data when the zoom level shows
large areas. This does not work will all maps but will work with the maps
generated from Tiger Line maps at the aprs.rutgers.edu site. This does not
decrease the loading times of the maps, rather it simply reduces screen
clutter.
- Enable Map Labels
- This option toggles the display of map labels embedded in dosAPRS, winAPRS,
GNIS, and ESRI shapefile format maps.
- Enable Area Color Fills
- This option controls the filling of vector maps. In certain cases, you
may want to eliminate the fill to see maps below the top maps. Maps are
loaded in alphabetical order by type, so renaming maps is a second but
less elegant way to achieve the look you want.
- Enable Weather Alert counties
- This toggles the display of county warning area maps for severe weather.
These maps can be obtained and installed according to the directions in the
README.1ST file. They are displayed on screen when special weather alert
messages are received, and expire after a time or can be remotely cancelled.
The weather alert text can be seen under View|WX Alerts.
- Background color
- This option controls the color of the background behind the maps you have
displayed. The background color is often entirely hidden by filled maps
(see above).
- Map Intensity
- This controls the brightness of any graphics used as maps. This option only
appears if you have compiled with GeoTIFF support.
- Adjust Gamma Correction
- This allows you to apply gamma connection to all loaded map graphics. Maps can
be adjusted individually in their .geo files, see the section on .geos in
"Map files and WX Counties". This option only appears if you've compiled with
ImageMagick support, and does not apply to geoTIFF maps; see the above option.
- Station Text Style
- Controls which font and style to use for station text and others.
- Mouse pointer menu
- This option brings up the options menu normally available by right clicking.
One note on maps: Many of the currently available vector maps for the
U.S. were created in NAD 1927 datum, while Xastir and other APRS(tm) programs
use WGS 1984 datum. If zoomed in to a small area on the map the datum
shift may be very noticeable. The USGS topo maps have their datum
corrected by Xastir as they are displayed, so positions will generally
be more accurate with those topo maps.
Map files and WX Counties
Map Types
Xastir will work with various types of map files. All DosAPRS, Windows/Mac
APRS(TM) map files are supported. Additionally, Xastir natively supports
PocketAPRS format maps, GNIS (Geographic Names Information System) labels
and XPixmap format graphics. Xastir also can be compiled to use external
libraries to support GeoTIFF topographic maps, and ESRI shapefile maps.
The graphics handling capability of Xastir can be greatly extended by
compiling with ImageMagick support, enabling support for many graphic
formats as maps (see http://www.imagemagick.org/www/formats.html). Xastir supports weather
alert maps in the classic dos/winaprs format, but support for the new ESRI
shapefile format for weather alerts should be completed soon.
Details of locations to obtain many of the obove types of mapss are found in
the file README.1ST
Map Locations
Any Dos map file should be stored in the /usr/local/xastir/maps directory on
your computer. You can create any number of directories under this directory
to help separate your data.The maps will be listed in alphabetical order with
their relative path in the Map Choser dialogue. Symbolic links could help to
reorganize the order.
Hints on installing and organizing maps are found in README.1ST.
Maps in a pixel graphics format actually need a combination of two files,
a data file with a graphic pixmap (.xpm) (or other format if you compiled
with ImageMagick), and a calibration file (.geo). The .xpm file is the standard graphic format, available
without additional libraries. If you
want to save storage space you can use gzip to compress those files
("gzip map.xpm" will result in "map.xpm.gz"). Xastir detects this
automatically during map loading. You can use XView/Gimp/ImageMagick and
other programs to convert gif, jpg, and tif images into this format if
you didn't compile with ImageMagick. If you get problems with maps in
xpm format, please try to load and save the graphics with Gimp first, to
convert all unknown colournames into the binary representation.
The geo file is a text data file that will tie the image to a location
in the world. Here is an example of a geo file that will cover the entire
world with the map world1.xpm:
FILENAME   world1.xpm
#          x          y        lon         lat
TIEPOINT   0          0        -180        90
TIEPOINT   639        319      180         -90
IMAGESIZE  640        320
.geo files can have many elements:
- FILENAME filename
- This specifies the filename of a map image to be loaded from the local disk.
- URL http://website
- This specifies the URL of a map image to be loaded from a web or ftp site.
ImageMagick only.
- TIEPOINT x-pixel y-pixel longitude latitude
- Two tiepoints are required, and more than 2 will be ignored.
these two lines are for connecting an x,y pixel position in the image
to a lat and long position on the earth. The points should be as close as
possible to the upper left corner and the lower right corner of the image for
best accuracy.
- IMAGESIZE pixels horizontally pixels vertically
- This specifies the size of the image in pixels. If this is not set, the image
will be loaded each map redraw, regardless if it is on screen or not.
- DATUM datum
- This feature is not implemented.
- PROJECTION projection
- This feature is only partially implemented, default is "LatLon", other
possibility is "TM" to specify that the map is in Transverse Mercator
projection.
- # anything
Any line with the first character of a '#' will be ignored.
ImageMagick specific image enhancements:
- GAMMA
- eg: GAMMA 1.2 or GAMMA 1.2,2.0,1.2
The first will change overall gamma for this image, the second will
lighten green more than red or blue.
- CONTRAST
- eg: CONTRAST 0 or CONTRAST 1
Doesn't seem to do that much, other values make no difference.
- NEGATE
- eg: NEGATE 0 or NEGATE 1
0 will negate all colors, 1 just grayscale colors.
- EQUALIZE
- No argument.
- NORMALIZE
- No argument.
- LEVEL black_point, mid_point, white_point
- eg: LEVEL 0,1,65535
These values seem to be the defaults.
- MODULATE brightness, saturation, hue
- eg: MODULATE 90,150,100
These are percents, 100,100,100 is the default.
Special/nonstandard .geo files:
- TERRASERVER
- A file with just the word "TERRASERVER" will cause Xastir to retrieve a
Terraserver satellite photo of the area on screen. Those services are not
available for every place in the world. Note that using the Terraserver
maps at any zoom above 256 will probably take a long time to load, won't
show much detail, and probably won't display correctly. This is a limit
of the Terraserver, not Xastir.
- FINDU
- CALL callsign
- A file with the word "FINDU" and the second line "CALL " will
retrieve historical data for the specified callsign, although using the
Stations menu is the preferred method.
geoTIFF maps are a combination of two files as well: a .tif and a .fgd file.
The .tif file is the actual map data. The .fgd file need only contain four
lines like this (but may contain many other lines):
1.5.1.1   WEST BOUNDING COORDINATE:  -122.000000
1.5.1.2   EAST BOUNDING COORDINATE:  -120.000000
1.5.1.3   NORTH BOUNDING COORDINATE:  48.000000
1.5.1.4   SOUTH BOUNDING COORDINATE:  47.000000
Xastir uses those four lines in it's calculations to determine the corner
points of a map, to see whether the map fits in the current viewport (so it
can decide whether to skip it). If your map data are USGS topo maps, the .fgd
file should be readily available to you. An added feature in Xastir is the
ability to do datum translations from NAD 1927 to WGS 84 datum, which makes the
USGS topo maps much more positionally accurate on the Xastir screen. If you
don't have the .fgd file, the map will load fine, but the white borders won't be cropped and the size and rotation may be off a tad bit.
Xastir can now use USGS geoTIFF topo maps directly from the CD drive.
Either manually mount the disk or use automounter to do it for you, and
make sure you have a symlink created in your maps directory that points
to where you mounted your CDROM drive. That's it!
Shapefile maps are also a combination of several files, a .shp file, a .dbf
file, and a .shx file. You only need to select the .shp to load the map,
but the other(s) must be present for the map to load correctly.
GNIS (Geographic Names Information System) data is a collection of names of
locations, or geographic features. These labels behave like map labels in
Dos/WinAPRS maps. As you zoom in, more labels will appear, assuming you've
selected the GNIS file as a map and have enabled Map Labels in the Maps menu.
WX County Maps
All WX County maps should be stored in the /usr/local/xastir/Counties and
Xastir only supports the new shapefile standard. Installation is explained in
the README.1ST section on obtaining maps.
As NWS messages are received, different areas will get tinted to designate
areas of concern. They are color-coded to specify different types of
alerts. The basic colors are: Cyan for advisory, yellow for watch, red
for warning, orange for cancelled alert, royal blue for tests, and green
for undetermined alert levels. With recent versions of Xastir the colors may
be different because the areas are tinted instead of color-filled, and the
tinting depends on the colors underneath. The tinting is done with a pixmap
stipple that displays the type of alert, if it is able to be determined.
These change was made so that the underlying maps may still be seen
underneath the weather alert areas, and so the alert type may be more easily
determined, as sometimes matching the alerts on screen and in the weather
alerts dialog is difficult. The display of weather alerts may be turned on/off
via the Map menu.